
Cara Menggunakan Change to color Effect di Adobe Premiere ( Lengkap )

Ada berbagai macam effect di adobe premiere, tapi ada 1 effect yg sering saya gunakan saat mengedit dedaunan atau rumput untuk di jadikan warna yg berbeda-beda. Dalam tutorial kali ini saya akan memabahas sedikit mengenai Cara menggunakan Change to color effect pada adobe premiere.


Change To Color kalimatnya saja kita udah memahami kegunaan effect tersebut. Mengganti warna dasar ke warna yang kita inginkan. tapi terkadang ada beberapa warna yg sulit untuk di gantikan. Tanpa basa basi langsung saja simak tutorialnya di bawah ini

Cara Menggunakan Change To Color Effect

Untuk menggunakanya tidaklah sulit teman-teman, hanya saja membutuhkan sebuah effect dari adobe premiere dan juga sebuah file yang cocok untuk di ganti warnanya. Jika kalian tidak mempunyai sebuah file yg ingin di gunakan, kalian bisa download link dibawah ini.

Download Transitions Motion Graphic

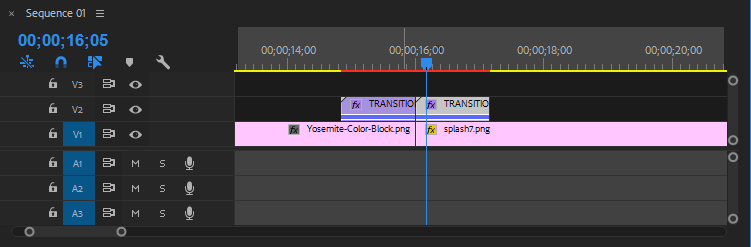
Langkah Pertama : Import file

Import file yang tadi kalian download atau file yg kalian ingin gunakan(tutorial ini saya khususkan untuk artikel download transition motion graphic). 

Setelah itu rapikan file tersebut dan Cut jika file tersebut merasa berlebihan. Contoh gambar dibawah ini.

Langkah Kedua : Drag & Drop Effect Change to color

Buka panel Effect > Ketik Change to color > Drag and drop effect tersebut ke dalam file yg di inginkan.

Langkah Ketiga : Setting Effect Control

Sekarang klik file kamu, lalu klik panel Effect Control untuk menyesuaikan warna di file kalian.

Sedikit penjelasan mengenai effect control
Disini kita bisa lihat panel effect control berbagai macam settingan.
  1. From = Ini adalah warna awal/dasar kamu pada file video tersebut.
  2. To = Ini warna yang ingin kamu ganti.
Jadi jika di translate begini "Warna putih mau di jadikan warna hitam"(Change From White to Black) begitulah maksudnya.

Ganti warna To menjadi warna yg teman-teman inginkan, lalu di bagian Change ganti dengan "Hue,Lightness & Saturation". Jika teman" tidak menyesuaikan dengan settingan yg saya punya, akan terjadi kegagalan perubahan warna. Untuk hasil ada di bawah ini.

Langkah Keempat : Buat Fade in & Fade Out Transition

Karena kita ingin menjadikan sebuah transition maka kita harus membuat fadein dan fadeout agar video terlihat kelihatan saat perpindahan videonya. 

Caranya : Duplicate File Transition tadi (Tahan ALT pada keyboard lalu tarik kesamping), lalu taroh di sampingnya video kedua. contoh gambar ada di bawah ini.

Lalu Klik kanan pada video yang habis di Duplicate tadi. > Pilih Speed/Duration > Conteng Reverse Speed

Maka hasil akhirnya jika kita preview akan seperti ini, Jika ada tanda merah di preview kalian Render to Out agar saat preview tidak terjadi patah" atau lag.

Sekian tutorial kali ini, jika kalian ingin mendownload file tersebut bisa langsung menuju link "Free download Transition Motion Graphic Adobe Premiere". Jika ada salah kata mohon dimaafkan dan jika penjelasan saya terlalu rumit mohon dimaafkan juga. Peace out.

Comments

Popular posts from this blog

Reflector 3 Mirroring Free For Iphone

Reflector 2 is a wonderful wireless mirroring application to help you stream your data, video, and content to the big screen without using any wires. Using it, you can easily play games, watch movies, present your demos and much more from your own palm. Developed by Squirrel LLC, you can buy this smart screen mirroring application for just $14.99 from the store. The reflector has many luring features which have made it very popular among the users. It has Smart Layouts which make it choose the best layout automatically when multiple devices are connected. The another feature lets you spotlight one screen that matters most when multiple devices are connected. You can easily hide and show devices without disconnecting it. The most killing feature is that you can directly send the mirrored screen to YouTube. The official website from where you can download it is http://www.airsquirrels.com/reflector/download/. It is a very user-friendly app which involves such few steps to use it. Link ...

iOS Screen Recorder Free For Iphone Mirroring

is one of the best solutions for screen mirroring for your iPad, iPhone or iPod. With iOS Screen Recorder, you can easily record the screen of your device. It allows you to mirror your iOS device on your computer wirelessly, record games, videos and much more. It is one of the cool application developed from Wondershare for the users for recording and mirroring the screen of an iOS device. Dr Phone-iOS Screen Recorder is very easy to use, and you can record and mirror your device screen in just a few steps. You can buy this wonderful mirror app from the official website of Wondershare. You can use this link for buying it: https://drfone.wondershare.com/buy/drfone-ios-screen-recorder.html. You can also try it for free for testing, but all features are not free of cost . Link Here

How to fix “Nox App Player has stopped working” error by increasing the virtual memory size in your computer

If your computer shows the above error message when running Nox, you could fix it by changing the Virtual Memory Paging File Size. By default, the virtual memory (also known as paging file) size is managed by Windows and it could change automatically. This may cause the above problem “Nox App Player has stopped working”. To solve this problem, simply follow the below steps to change the virtual memory size: 1. Right click the Computer icon on your desktop and then click  Properties . 2. Go to  Advanced system settings  in the left navigation panel. 3. In the  System Properties  windows, go to  Advanced  tab and click  Settings  under Performance. 4. Keeping going to  Advanced  tab and click the  Change  button. 5. Uncheck “”Automatically manage paging file size for all drivers” and select “Custom size” below it. Usually when set your own virtual machine size, it is recommend that you set it to your phy...